POPULAR SEARCHES
Why Turkey Became the World's Hair Transplant Capital
Turkey performs more hair transplants than any other country on earth. Istanbul alone is home to hundreds of clinics, and the sheer volume means many surgical teams perform thousands of procedures a year. That repetition matters: hair restoration is a craft, and experienced teams tend to produce more natural, consistent results.
The other obvious draw is cost. A procedure that might cost £8,000 to £15,000 in the UK or the United States often falls into the rough range of £1,500 to £4,000 in Turkey, frequently including the hotel stay and airport transfers. Prices vary widely by clinic and graft count, so treat any single figure as a starting point rather than a quote.
The flip side of a crowded market is that quality is not uniform. Some clinics are world-class; others over-harvest donor areas or oversell what is achievable. This is exactly why learning to read before-and-after results properly is the single most valuable skill you can bring to your research.
What "Before and After" Photos Actually Show (and What They Hide)
A before-and-after photo captures two moments in time. The transformation in between took roughly a year and passed through several unglamorous stages that almost never make it into the marketing image.
Photos can also be flattering in ways that have nothing to do with surgical skill. Lighting, camera angle, whether hair is wet or dry, hair length, and even hair fibre products can dramatically change how dense hair appears. A skilled photographer can make a modest result look spectacular, and a careless one can undersell a genuinely excellent transplant.
None of this means before-and-after photos are useless. It means you should treat them as evidence to be examined, not as a promise. The rest of this guide gives you the tools to do exactly that.

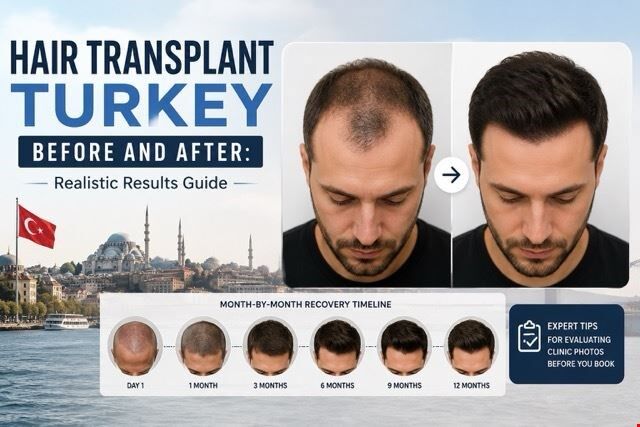
The Realistic Before-and-After Timeline, Month by Month
Understanding the recovery timeline is what separates an informed patient from a disappointed one. Most people who panic at month two simply did not know what was coming. Here is the full arc.
Before: Consultation and Planning
Your "before" is more than a photo. A good clinic assesses your degree of hair loss on the Norwood scale, measures your donor density (usually at the back and sides of the scalp), and designs a hairline suited to your face shape and age. This planning stage largely determines your "after." A natural, age-appropriate hairline designed for the long term will always beat an aggressively low one that looks odd a decade later.
Day 0 to Day 7: Immediately After
Right after surgery, the transplanted area is covered in tiny scabs around each newly placed graft, and there is often mild swelling on the forehead. This is the stage that looks the most dramatic and the least like a finished result. Redness and scabbing are completely normal. By the end of the first week, most scabs have gently washed away following the clinic's aftercare routine.
Weeks 2 to 4: The "Shedding" Phase
This is the part nobody warns you about, and it scares people who do not expect it. The transplanted hairs fall out. This is called shock loss or shedding, and it is a normal, expected part of the process. The hair follicle survives beneath the skin; only the visible hair shaft is shed before the follicle enters a new growth cycle. If you took a photo at week four, your "after" might look worse than your "before." That is temporary.
Months 3 to 4: Early Regrowth
New hairs begin to push through. At first they are fine and may look slightly thin or patchy, and they often grow in unevenly. This is the genuine turning point where patients start to feel optimistic again. The results are real but immature.
Months 6 to 9: Visible Density
By now, the majority of transplanted follicles are producing hair that is thickening and lengthening. This is usually when friends and family start to notice without being told. A photo taken here already looks like a strong result, and it is the earliest point at which a meaningful before-and-after comparison is fair.
Months 12 to 18: The Final Result
Full maturity. Hairs reach their final calibre, density peaks, and the texture blends naturally with surrounding hair. Crown areas and larger sessions can take the full 18 months. The honest, credible before-and-after photo is the one taken at this stage, not at month six.
The Factors That Decide Your Before-and-After Outcome
Two patients can visit the same clinic, have the same surgeon, and walk away with very different results. Here is why.
Your Starting Point
Your degree of hair loss and the quality of your donor area set the ceiling. Someone with a Norwood 3 hairline and dense donor hair has more raw material to work with than someone with advanced Norwood 6 loss and a thin donor zone. A realistic clinic will tell you what is achievable rather than promising a teenager's hairline to a man in late-stage loss.
Graft Count and Design
More grafts are not automatically better. What matters is matching graft count to the area being covered and distributing them intelligently, with finer single-hair grafts at the hairline and denser multi-hair grafts behind. Over-harvesting the donor area to inflate a graft number can permanently thin the back of your head, which is a cost that never shows up in a glossy "after" photo.
Technique: FUE vs DHI
Most modern Turkish clinics use FUE (Follicular Unit Extraction) or DHI (Direct Hair Implantation). Both extract individual follicles without a linear scar. DHI uses an implanter pen that can allow denser placement and is often used for hairlines, while FUE is highly versatile for larger areas. The technique matters less than the team executing it. A skilled FUE result beats a rushed DHI one every time.
The Surgical Team's Skill
In high-volume clinics, technicians often perform much of the extraction and placement. The angle, depth, and direction of each implanted follicle determine whether the result looks natural or like a doll's hair. This artistry is the hardest thing to judge from a single photo and the most important thing to verify.
Aftercare and Lifestyle
Following the washing protocol, avoiding smoking, sleeping at the right angle in the first nights, and protecting the grafts from the sun all influence how many follicles survive and thrive. Your "after" is partly in your own hands.

How to Evaluate Before-and-After Photos Before You Book
This is the practical, actionable core of your research. Use this as a checklist.
Insist on the Full Timeline, Not Two Photos
Ask the clinic for a sequence: pre-op, immediately after, month three, month six, and month twelve. A clinic confident in its work will have these. A clinic that only offers a polished pair may be hiding the messy middle, or may be showing you someone else's results entirely.
Check That Conditions Match
Compare like with like. If the "before" shows dry, flat-lit hair and the "after" shows styled, fibre-product hair under flattering light, you are comparing a transformation to a photoshoot. Genuine cases show the same lighting, angle, and hair condition in both images.
Ask for Video and Multiple Angles
Video is much harder to fake than a still image. A short clip of a real patient running their hands through their hair, shown from several angles including the crown, tells you far more than a single frontal shot.
Match the Case to Your Own
Find before-and-after examples where the starting point resembles yours. A spectacular result on a Norwood 2 patient tells you little about what is achievable for advanced loss. Ask specifically to see cases with your degree of thinning and similar hair type and colour.
Watch for Red Flags
Be cautious of identical "after" photos reused across different patient profiles, results that look impossibly dense for the donor area shown, reviews that all sound the same, or testimonials with no verifiable source. Authentic patient stories come with consent, consistency, and detail. If a clinic cannot connect you with a past patient or provide consented, timeline-based documentation, treat that as a warning sign rather than a minor inconvenience.
Setting Honest Expectations
A hair transplant redistributes hair you already have; it does not create new hair from nothing, and it does not stop ongoing genetic hair loss in untreated areas. Many people continue medication such as finasteride or minoxidil after surgery to protect their native hair, and some patients benefit from a second session for added density or to cover progressing loss. A clinic that frames the procedure as a single, permanent, effortless fix is overselling. The best long-term results come from a realistic plan, not a one-time miracle.
When you go in understanding the shedding phase, the year-long timeline, and the role of your own donor area, the before-and-after journey stops being a gamble and becomes a managed, predictable process.

Find Verified Before-and-After Results With Flymedi
The right clinic and the right expectations make all the difference between a result you are proud of and one you regret. At Flymedi, we have spent more than a decade connecting international patients with experienced, vetted hair transplant clinics in Turkey, so you can compare genuine, documented before-and-after results, transparent pricing, and authentic patient feedback in one place.
Ready to see what realistic results look like for your hair? Get a free, no-obligation consultation through Flymedi, compare trusted clinics side by side, and make your decision based on evidence rather than guesswork. Start your hair transplant journey today.
By Akya Karahan - Medically reviewed by Dr. Mehmet Dogruer, on Jun 15, 2026Before / After


RECENT POSTS


.jpg?w=100)

CATEGORIES
POPULAR TAGS
FLYMEDI HELPS YOU
Take The First Step Get Started!
Our team will dedicate their effort and time to help you choose the clinic best for you. Our goal is not just to find ‘a doctor’ for you, but to find ‘the right doctor’.

